Oh no, I haven’t got a microphone…Hang on, Yes I Have!
You want to make a recording to play on your radio station. Perhaps it’s a message to go before a song request; maybe you need to broadcast an emergency message; or maybe you need to record an intro for one of your special music programmes.
And would you believe it…you don’t have a microphone! Believe it or not, there are many broadcasters who – for lack of funds – are not able to set up their own microphone and audio mixer to do basic voice recordings. Even the budget for a reasonable USB microphone is out of reach. What options do you have?
 Let me ask you this…what is in your hand? It’s something that you are very likely to have, and you use every day. Yes, you guessed it…your mobile phone.
Most modern phones are equipped with a half reasonable microphone, and if you find yourself stuck without a station microphone, it can make a handy substitute.
Here are some tips for turning your mobile phone into a studio microphone.
Download a recording app. There are some good ones out there – often free with ads, or a few dollars ad free. For iphone, I have used the Rode recording app. In Android I use RecForge II. These apps have one essential feature you will need – a recording volume.
Find out which way to point it! It sounds silly but, many phones have multiple microphones these days. Make some recordings, and listen back on headphones. Decide which way gives you the most direct sound.
Hold the phone’s microphone at an angle to your mouth, to avoid breath popping. However, hold it fairly close, to eliminate room echo and background noise. As you hold it closer to your mouth, use the control to reduce the recording volume. I have mine set to -4dB.
If possible, use some kind of stand or holder. That way you will eliminate handling noise. There is a range of weird and wonderful mobile phone holders available out there – I’m sure one could be adapted into a phone / mic stand. Reading lamp stands, goose neck mic stands or even really thick wire may do the job (remember, necessity is the mother of invention).
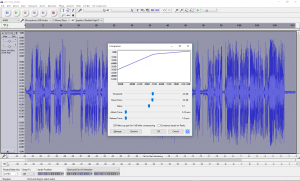
Once you have made your recording, you need to transfer it to your computer. Android phones will allow simple USB cable copy and paste transfer. Iphones will have other transfer methods (URL or iTunes). The, we need to process the audio. We do this to eliminate unwanted noise, and make the voice sound richer. Here is one suggestion, using the free Audacity editing software (PC, Mac, Linux or Android).
Use noise reduction software to remove constant background noise, like a fan. Audacity’s default noise reduction setting works well.
Add some EQ. You may need to experiment with this a bit, depending on the qualities of your phone’s microphone. However, this is how I set mine:
- Get rid of anything under 100Hz
- 300 – 1000Hz, drop by 3dB
- 5000 – 16000Hz, drop by 2dB (my phone gave me too many highs)
Normalise to 90% (or -1)
Add compression. I used a -30 threshold, and a 5:1 ration. This added warmth and richness.
Limiter – to even out the levels, I set this to soft limit at -4dB.
Normalise again to 90% (or -1).
One downside is that my breath sounds were un-naturally over amplified, and I had to go through and reduce the volume of some of those.
OK, it may not sound as good as an Audio Technica or a Sennheiser. But it’s better than your built-in lap top mic, and it’s better than no announcement at all. At least it’s clear, and it won’t sound half bad…at least until you can save up for a decent microphone.
Happy broadcasting
: Blogs